One thing that I love about stamping is that there are always more techniques that you can learn and master and there are sooooo many different ideas out there to try :).
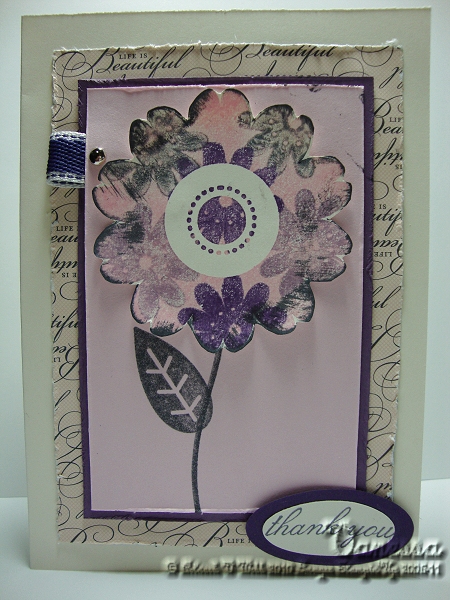
The card above uses the” Kissing ” technique. For the centre image of my card, I have used the large, bold flower image from the retiring stampset – Petal Pizzazz – as well as one of the smaller flower images.
So here’s how I made my card:
Step 1 – Start by folding an A5 sheet of Very Vanilla Cardstock in half to form the base of your card.
Step 2 – Cut a piece of Designer Series Paper to fit on the front and a smaller piece of coordinating cardstock (I’ve used Lap of Luxury DSP and Perfect Plum Cardstock).
Step 3 – Cut a slightly smaller piece of cardstock to layer on the very top of the card – I’ve used Pink Pirouette. Distress around the edge off all three pieces using the 7-sided Distressing Tool before stamping and layering onto the card base.
Step 4 – Ink up the large flower stamp in a pale coloured ink (I’ve used Pretty in Pink), place on work surface, rubber side facing up.
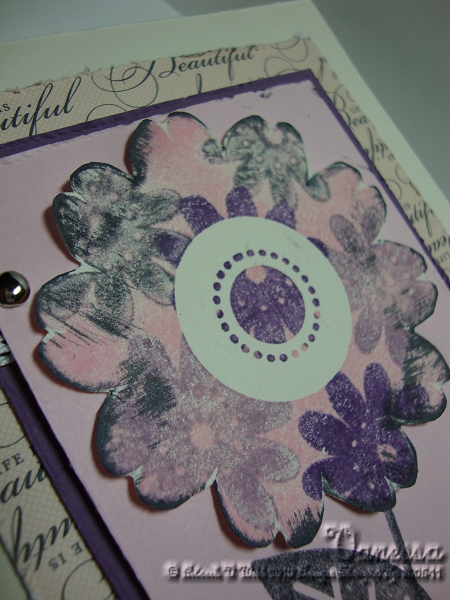
Step 5 – Ink up the smaller flower in a coordinating ink and “kiss” it several times onto the rubber of the larger image stamp. You can stamp the smaller image several times in different colours, cleaning in between each stamping.
Step 6 – Flip the stamp over and stamp onto a piece of Very Vanilla cardstock.
Step 7 – Cut out your flower image with Paper Snips (leave a 1mm edge around the image), swipe Basic Grey Ink Pad around the flower petals to give them some more definition.
Step 8 – Stamp the stem and leaf image onto Pink Pirouette cardstock in Basic Grey Classic Ink.
Step 9 – Adhere cut out flower image to top of flower stem with Anywhere Glue Stick.
Step 10 – Adhere scrap of ribbon(I’ve used Concord Crush Poly Twill Ribbon) to side of Pink Pirouette Card with a Silver Brad using Paper Piercer and foam mat.
Step 11 – Stamp greeting (I’ve used the “Thankyou” stamp from the retiring Because I Care Hostess set) and punch out with retiring
1 and 3/8″ x 5/8″ Oval Punch. Layer onto co-ordinating cardstock punched with the 1-3/4″ and 7/8″ Oval Punch (I’ve used Concord Crush).
Step 12 – Adhere everything together with desired adhesives.
Here is a close-up of the large flower :

Here is a list of all the products used to make the card (all available from Stampin’ Up! through me) items marked in RED are retiring and are still avaialable at the time of this post :
Stamps – Petal Pizzazz Wood Mount Stamp Set, Because I Care Hostess set.
Ink – Basic Grey, Pink Pirouette, Perfect Plum, Concord Crush Classic Ink Pads.
Paper – Lap of Luxury Designer Series Paper, Very Vanilla, Perfect Plum, Pink Pirouette, Concord Crush cardstock.
Accessories – Paper Snips, Stampin’ Dimensionals, Anywhere Glue Stick, Cutter Kit, Silver Brad, Paper Piercer and Foam Mat from Matt Pack, 1 and 3/8″ x 5/8″ Oval Punch, 1-3/4″ and 7/8″ Oval Punch.
Speaking of retiring items, some things have already sold out and there are several items that we have already “kissed” goodbye to from the list.
You can no longer order the following products –
Antique Brass Jumbo Eyelets
Metallic Eyelets
Pewter Jumbo Eyelets
Photo Corners Punch
Star Punch
The GOOD NEWS is that all of the stamp sets are still available at the time of this post (some of them heavily discounted too!) but the list is updated daily as things sell out…..so you’ll need to be quick to make sure that you grab your favourites before they go!
You can view the entire Retiring List HERE.
****************************************************************
Don’t forget to take advantage of my speical offer to blog readers and newsletter recipients this month – receive your brand new 20011/2012 Idea Book and Catalogue hot off the press with any customer order for FREE (valued at 13.60).
****************************************************************
If there is anything that you would like to order from the retiring list or from the current catalogue please email me or phone h 02 4271 8121 m 0407 497 540 and I’ll be happy to organise it for you!


 by
by